Tuesday, May 3, 2016

The Devil is in the Details: Part 2

The cab's detailing process was very similar to the cars, but this time with some fiddling to get the windshield to be correct.

Line up the picture.

Trace.
The end result was a monorail that actually looks like a vehicle!


After printing out a copy or two, things were starting to look like a model train set as well.


Looks though, can be deceiving. This project is not nearly done, with many more engineering challenges on the way.

Tuesday, November 17, 2015

The Devil is in the Details: Part 1

The realization that I wasn't artistic enough to paint the outside detail on brought me to try to see just what detail my 3d printer was capable of. The nozzle size on the printer is .4mm, so I found out quickly that I should not try anything smaller than that... but would that be small enough to do what I wanted it to? I decided before I put the time and effort into putting some detail into the 3d model, I should run a test to see how things looked.

Looks terrible, but did the job.

The test model I made had different settings on different sides to see what looks best. The test model didn't look very good, but gave me the confidence that the printer could add the detail I wanted.

When I decided it was possible to add some detail to my 3d model, I again needed some source images. This time, my search went very smoothly. Instead of trying to use some real pictures of the monorail I settled upon some perfect drawings by Deviant Art user BJ-O23. I took his drawing of the monorail, cut out one train, then split the train into two separate images, a cab and a car. I figured the car had the most work to do, so I started with that.

I began by lining up the picture with the edges of the 3d model. I was very excited when things actually lined up. I was worried things would be different sizes, but it was at this point that I started to figure that the drawings were made off of the same source images that I used to model the train.

All lined up

Next came tracing the the drawing with an inventor sketch. Because of the nozzle size constraints, you can see all the measurements to make sure things did not get smaller than .4 mm.

Pretty Sketchy

After the sketch was complete, I used the engrave feature of Inventor to have the cutouts follow the contours of the side of the monorail car.

After I completed this side, I figure the roof needed a little flair. So I added a simple roof rail, and the emergency hatches. For the eagle eyed reader, you'll notice that the hatches are on the wrong side, this was not a mistake. My 3d printer, or 3d printing software mirrors the x-axis. I can mirror the model before I print in the printing software, but I tend to forget to do that, so I just modeled the axis flipped. When it prints out, the hatches are on the correct side.


For a little bit of fun, I went ahead and textured the model when I was done.

Looks pretty good doesn't it?
Then it was time to print. When you first print the model out, the details are really hard to see. Sanding makes them pop a little more, but painting does the job. Unfortunately,  I got a little too excited and painted too early. I should have sanded much, much more before painting.

Printed, sanded, painted, sanded
What I didn't think about was how much the paint would fill in the grooves that I wanted to keep. So instead of allowing the paint to smooth out the surface like I did for the smooth exterior model, I am going to have to sand it perfectly smooth before painting. For the next iteration I am also going to make the grooves .1 or .2mm deeper. Besides that, I was quite chuffed with the result. 

Cab next!

Thursday, November 12, 2015

The First Prints

After I got the cab modeled up, and extruded out a car from the profile of the cab, it was finally time to see the fruit of my efforts. Unfortunately, due to size constraints of my printer, I couldn't print the nosecone and car together in one piece.

Nosecone on baby track

Car, eating baby track
I was really happy when each of these pieces printed without much hassle. I had some problems with the car sticking to the build platform of my printer, but a couple of settings tweaks, and adding some surface area touching the platform with a brim of plastic around the edge allowed it to complete easily.

The print was the easy part. Next came sanding. A lot of sanding. More sanding that I would have ever thought. Some sanding could probably have been mitigated with primer that had some filler, but I thought of that a little late. After I thought it was silky smooth, I shot the two pieces with a coat of white spray paint. After letting the pieces dry I found out that the paint really showed just how rough the pieces really were. I decided at this point, before I did any more sanding that I would join the two pieces to make sure things were painted evenly, and to hopefully cover up the seam between the two.

I read online that superglue was the best way to join PLA pieces together. Many people had a lot of success with just simple superglue. Well, results may vary and my results were pretty bad. This was most likely due to the small surface area of the two objects I was trying to glue together. After a few trys and failures, the two pieces became one, and I was back to sanding. After a few million more coats of paint, and sanding and more paint, I was finally pretty happy with the result.

The result.
It was when I got to this point that I realized I had a problem with this blank canvas of a monorail cab. My limited artistic skill would make drawing or painting the details. I had a better idea... print in the detail!

Thursday, October 29, 2015

Step 2: Modelling

After I got my resources together, I knew I would have an uphill battle. Modeling a monorail car is easy, sketch out the profile and extrude it out to length. What I didn't know how to do was model the cab. The problem with the cab is that it curves in multiple directions, and a cad program like inventor doesn't handle freeform shapes very well. Engineering things are usually made up of simple shapes. My first attempt was pretty bad, using only the tools in Inventor that I knew well.

Yeah, pretty sad
 Using the profiles I had, I extruded the back, and cut the sides. This left me with something that looked good in the profile views, but terrible in general. My problem was, I didn't know how to do any better. I was beginning to think that what I was trying to do wasn't possible in Inventor. I started to look into other modeling programs, but I was overwhelmed. After ruling out an easy transition to another modeling program, I took motivation in the loading screen of Inventor, with all these free flowing shapes. But how do they make them? I did what I always do, and asked Reddit. Reddit told me about "surface modeling" and "the loft tool". I had never dealt with just surfaces, usually in Inventor, you deal in solids. You can extrude solids from sketches, you can cut solids with sketches. Its surprising the amount of things you can do just by adding and subtracting straight lines of material. Sadly, making a monorail cab is not one of these things. I started watching youtube videos and looking up guides and experimenting with the loft tool to make surfaces rather than solids. The loft tool creates a surface between two drawn profiles along a drawn path. My first attempts were not very good. The problem with the loft tool is that it makes a lot of assumptions while trying to make a smooth surface.


That shape is sorta nice, but there are some terrible folds

I tried to give it some more information about the profile

I call this one Lumpy

Wait that doesn't look too bad

Looking pretty monorail like, but without the bottom skirts

At this point, I decided I had a model that was worthy of a print, not because it was perfect, but to see what I had to change to get it there.

Those are 1 inch squares
When you are able to get your hands on the model, it is much easier to see where the problems are versus its representation on the screen. The main thing I needed to change was the goiter the cab had. There was a little too much curve on the underside of the nose.

From here I did what any sane person would do, and started over completely with my now honed knowledge of the loft tool.

Final Product
I had some trouble with the skirts, and by a stroke of total luck, after days of trial and error, I stumbled upon something that worked after I accidentally did something. I don't think I could replicate how I did it if I wanted to, so I called this version close enough. I was proud of the final product, and that's all I could ask for.

Tuesday, October 6, 2015

The Surprise


Hmm, all those parts look so interesting... Alone they can do so little, together they can 3D print. After dropping way too much on a PrintrBot Play and waiting a week for it to be delivered, I was finally able to start putting it together. Like a kid on Christmas day I tore into the 17 pound box of parts. When you order a PrintrBot, you have the choice between a pre-assembled bot or kit. The special thing about this choice is that both options are the same price. They heavily urge you to order the assembled unit because "they're better at putting them together". Despite their advice, I ordered the kit, and it was not because I saved $10 on shipping that way. Tinkering is what I do best, and what better way to learn every nuance of the printer than to build it from its pieces. I did not, however know how frustrating some of the assembly would be.

There are step-by-step instructions on the PrintrBot website to follow to put things together, so I jumped in and got started.

The base and its stepper motors in place, before having to take it all apart again.
Things went fairly smoothly through the build process, with only minor frustrations arising from missing steps or putting the wrong stepper motor in the wrong place. One of the most annoying parts of the process came when it was time to work on the y-axis bar.

y-axis bar.
First, I managed to overtighten the plastic that holds the linear bearings to the extruder, and break the bracket a bit. This was easily mended with a squirt or two of super glue, and very carefully screwed back into place. The next step involved installing and tensioning the rubber drive belt. To hold the belt in place, each size was wrapped around and then zip-tied to itself. Some tensioning screws could then be tightened to pull the belt tight. The problem I kept facing was that the belt did not want to stay ziptied to itself, and would come loose when I tried to tighten it. Some swear words later, the last mechanical pieces were assembled, the last wires were plugged in, and I had a *working* printer.

 Next came the long process of calibrating the printer so it could print a little test cube without grinding the nozzle into the print bed. Unfortunately, in order to to this, the nozzle ended up digging to into the print bed time after time, while I tried to learn how to fix everything. 

Progression of failed prints, resulting in a successful 2cm by 2cm by 3mm test cube.
When I finally thought I was getting somewhere, I hit another setback. My nozzle clogged, and the plastic filament got stuck in the long heat sync on the extruder. I tried many different ways of unclogging everything, from turning the print temperature way up and forcing the filament through, to turning the temperature down and pulling the threat out the "in" side. Nothing worked and I was beginning to think "oh good, I broke this damn thing on the second day I got it". It was time to get serious, so I took a blowtorch, heated up the tube and heated up a needle, stuck the needle down the tube, waited for everything to cool (only burning myself 30 or 40 times) and to my surprise, was able to pull out the 3 inches of plastic that was clogging everything up. After this success, I was able to print the test cube, and with that successful, It was time for my first "real" print.


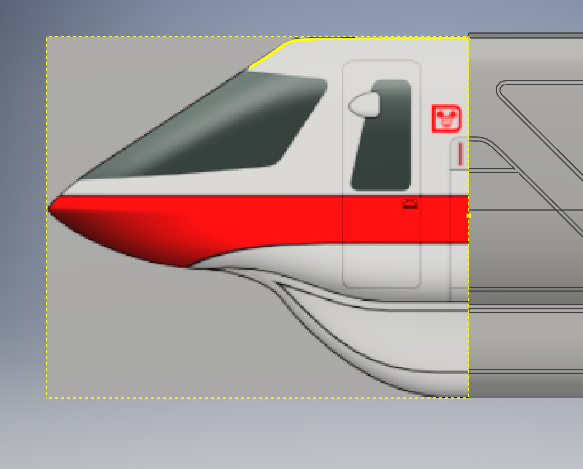
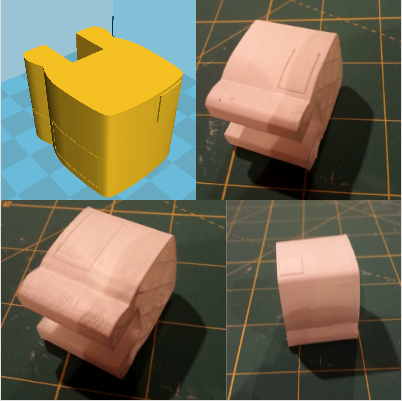
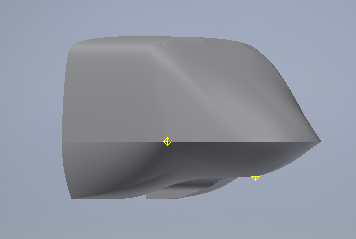
The product was a Tomorrowland Transit Authority ride vehicle, because Disney nerds gonna be Disney nerds. 

This 3D printer is going to be vital to the construction of the Mark VI monorail, and I plan to utilize the printer to get accuracy that I could never achieve by hand.

Conclusions:
  • 3D printers are not plug and play
  • 210 Degrees Celsius hurts when you touch it
  • Sometimes you just need to walk away
  • 3D printers are really cool, what a time to be alive